Pickleball is taking the sports world by storm, and having a pickleball practice wall at home can seriously up your game.
Whether you’re a seasoned player or just picking up a paddle, this DIY Practice wall guide will walk you through step by step, how to build the perfect Pickleball practice wall. From selecting the right spot to the finishing touches, we’ve got you covered.
Get ready to transform your practice sessions on the Pickleball Training Wall and bring the fun of Pickleball right to your doorstep. Let’s dive in and learn how to make a pickleball practice wall.
How do you choose the right location for your practice wall?
When planning to build your pickleball practice wall, selecting the ideal location is essential for maximizing its benefits and ensuring longevity.
To choose the right location, you need to consider the following:
- Indoor or outdoor location
- Space requirements
- Sunlight and weather Exposure
Indoor vs. Outdoor Considerations for Practice Wall
An indoor wall is perfect for year-round practice, unaffected by weather. However, space might be limited, and you’ll need to ensure adequate ventilation to avoid any damage from the ball’s impact.
Outdoor walls offer more space and natural lighting, making them ideal for those with enough yard space. They allow for a more authentic practice experience but require materials that withstand weather conditions.
Space Requirements
Ensure there’s enough room for not just the wall but also for moving around and playing. A minimum space of 20 feet in length is recommended to simulate a real pickleball court feel. Remember, the more space, the better to accommodate a wide range of shots and movements.
Sunlight and Weather Exposure
If outdoors, consider the direction of sunlight throughout the day. Position your wall to minimize direct sun glare, which can affect visibility and comfort during practice.
For outdoor walls, choose materials and paint that are weather-resistant. Consider a location that offers some natural protection from the elements, or plan to add a protective cover during harsh weather conditions.
Planning Your Pickleball Practice Wall

Once you’ve chosen the perfect spot for your pickleball training wall, it’s time to dive into the planning phase. This step is about nailing down the specifics: dimensions, materials, and design considerations. Let’s break these down to ensure your practice wall meets all your needs.
Dimensions and Size
While there’s no “official” size for a practice wall, aiming for a height of at least 8 feet and a width of 12 feet will closely mimic the experience of playing on a standard pickleball court. This size is ample for practising a wide range of shots.
Tailor the dimensions based on your available space and personal preferences. Going wider can give you more room for lateral movement and various shots. However, even a smaller wall can be beneficial for focusing on specific skills like precision and control.
Material Selection
Plywood is popular due to its affordability, ease of installation, and good rebound qualities. It’s sturdy enough to withstand repeated impact yet flexible enough to provide a realistic bounce back.
For those looking for more durability and weather resistance, consider using marine-grade plywood or composite panels. These materials can better withstand the elements, making them ideal for outdoor setups. Additionally, reinforced concrete or cinder block walls can offer exceptional longevity and performance for a more professional feel.
Design Considerations
There are two types of design: fixed and adjustable walls. A fixed wall is a solid choice for simplicity and stability. However, an adjustable fence can offer versatility, allowing you to change the angle for different types of practice. This feature can be handy for simulating various opponents’ shots.
Optional: Adding Mobility Features for Easy Relocation: If you’re tight on space or plan to use your practice area for multiple activities, consider integrating wheels or a modular design. This allows for easy movement and storage when the wall is not in use, offering flexibility in your space.
If you want to make a pickleball wall in the garage watch this video or read the section below.
How to Make a Pickleball Practice Wall?

Constructing your pickleball practice wall requires attention to detail and a systematic approach. Whether you’re a seasoned DIYer or new to home projects, these steps will help you build a durable and practical practice wall. Let’s walk through the steps from preparation to the finishing touches.
Step 1: Preparation
Begin by gathering all necessary tools and materials. You’ll need plywood sheets (preferably marine-grade for outdoor use), 2x4s for framing, screws, sandpaper, paint, and protective gear for safety. Ensure you have measuring tools, a circular saw for cutting, and a drill for assembly.
Ensure safety because it cannot be overstressed. Wear protective eyewear, gloves, and ear protection when cutting and drilling. Work in a well-ventilated area, especially when painting or applying any finishes.
Step 2: Building a Reinforced Plywood Screen
If your wall exceeds the size of a single plywood sheet, you’ll need to join multiple sheets. Use 2x4s as backing at the joints to provide stability and support. Screw the plywood sheets into the 2x4s, ensuring a flush and secure join.
When reinforced, attach 2x4s around the perimeter of the plywood panel. This frame adds rigidity and prevents the plywood from warping over time. Ensure the frame is securely attached to the plywood using screws spaced evenly around the edge.
For added durability, especially for more enormous walls, install horizontal and vertical 2×4 supports across the back of the plywood panels. These supports distribute the force of the balls across a larger area, reducing stress on any single point.
Sand the plywood surface to remove any rough spots or splinters. Apply a primer and paint designed for exterior use if the wall is outdoors. Consider a semi-gloss finish to help the ball rebound more predictably.
Step 3: Create a Plywood Screen on a Solid Frame
Build a frame using 2x4s or 2x6s for extra durability. The frame should match the desired dimensions of your practice wall. Use corner braces and screws to ensure a sturdy frame that won’t wobble or shift.
Place the plywood sheets onto the frame and secure them with screws. Ensure that the plywood is flush with the frame without gaps or overlaps.
Once the plywood is secured to the frame, sand the entire surface to prepare it for painting. Apply a primer and paint, choosing colours that will enhance visibility or mimic the appearance of a pickleball court. Bright colours for the target areas help with aiming and skill development.
Each step in this construction guide is crucial for creating a practice wall that’s effective for improving your pickleball skills and durable enough to withstand repeated use. Follow these detailed instructions, and you can build a training wall tailored to your specific needs, whether for casual play or serious training.
Remember, The quality of your practice wall directly influences your practice quality, so take the time to build it right.
Customization and Enhancement Tips
Creating a functional pickleball practice wall is just the beginning. Consider incorporating customisation and durability features to make it your own and enhance your practice experience. These tips will help you tailor your practice wall to suit your playing style, ensure longevity, and add a professional touch to your sessions.
Painting and Markings
Opt for durable, weather-resistant paint, especially for outdoor walls. A semi-gloss or gloss finish looks professional and provides a consistent rebound surface. For indoor walls, ensure the paint is suitable for the material of the wall and the environment (e.g., resistant to moisture if in a basement).
Painting target areas on the wall can significantly improve your practice by providing specific spots to aim for, enhancing your accuracy and control. Use bright, contrasting colours for these targets to make them easily visible. Consider incorporating different shapes and sizes to mimic various shots and angles in a game.
Durability Enhancements
- Weatherproofing for Outdoor Walls: If your practice wall is outdoors, apply a weatherproof sealant over the paint to protect it from rain, sun, and temperature changes. This extra layer can significantly extend the life of your wall, ensuring it remains in good condition for years to come.
- Maintenance and Care Tips: Regularly check your wall for signs of wear and tear, such as chipped paint, warping, or loose screws. Addressing these issues promptly can prevent further damage and maintain the wall’s integrity. Clean the wall periodically to remove dirt, debris, and any buildup affecting the ball’s rebound.
Skill Development Features
For those looking to challenge themselves, consider building a wall with adjustable sections. By changing the angle of these sections, you can simulate different types of shots and returns, adding variety to your practice sessions.
Also, you can incorporate a net quality that is optional for all practice walls; adding a net at the standard pickleball net height can help you practice serves and returns more accurately. This feature can be handy for players focusing on their serve technique or those without access to a court for regular play.
How to Install and Use Pickleball Training Wall?
After meticulously planning, building, and customizing your pickleball practice wall, the final steps involve properly installing and incorporating it into your practice routine. Now it’s time to guide you through the installation process, ensuring safety and stability, and discuss how to effectively use your new practice wall to improve your pickleball skills.
Mounting Your Practice Wall
It doesn’t matter whether your practice wall is indoor or outdoor; securing it properly is crucial to prevent accidents and ensure longevity. For outdoor walls, anchor the structure to the ground using concrete footings or deep-set stakes, especially in windy areas. Indoor walls should be firmly attached to wall studs or a similarly stable structure to handle the impact of repeated ball strikes.
After installation, perform thorough stability checks. Push against the wall from various angles to ensure no movements or wobbles. The wall must remain immobile during practice to mimic a real pickleball court’s conditions accurately.
Effective Practice Strategies
Utilize your practice wall for drills designed to improve accuracy, power, and control. Practice serving against the wall, aiming for specific targets to refine your precision. Rally against the wall to enhance your reaction time and consistency.
Experiment with different strokes, such as forehands, backhands, and volleys, focusing on hitting the ball with proper form and technique.
Mark different areas on the wall for practising a wide range of shots. Use these markings to challenge yourself to hit consistent shots in desired locations. This practice can significantly enhance your in-game accuracy and ability to place shots where your opponent least expects them.
In addition to technical skills, use your practice wall sessions for physical conditioning. Incorporate movement drills that mimic game scenarios, such as quickly transitioning from one side of the wall to another, to improve your agility and endurance on the court.
How Much Does it Cost to Make a Pickleball Practice Wall?
The cost of building a pickleball practice wall can vary widely based on the materials used, the size of the wall, and whether you already own some of the necessary tools. A bare DIY plywood wall might cost anywhere from $200 to $500, including plywood, 2x4s for framing, screws, paint, and essential tools like a saw and drill. If opting for more durable materials or adjustable features, the cost can increase to $800 or more.
Comparing DIY vs. Pre-made Rebounder Costs
Premade pickleball rebounders are available on the market, with prices ranging from $150 for basic models to over $1,000 for high-end versions with adjustable angles and larger sizes. While the initial cost of a premade rebounder might be comparable to or slightly less than a DIY project, the customization and size options of DIY walls often provide better value for serious players.
Making Pickleball Practice Wall in Your Garage
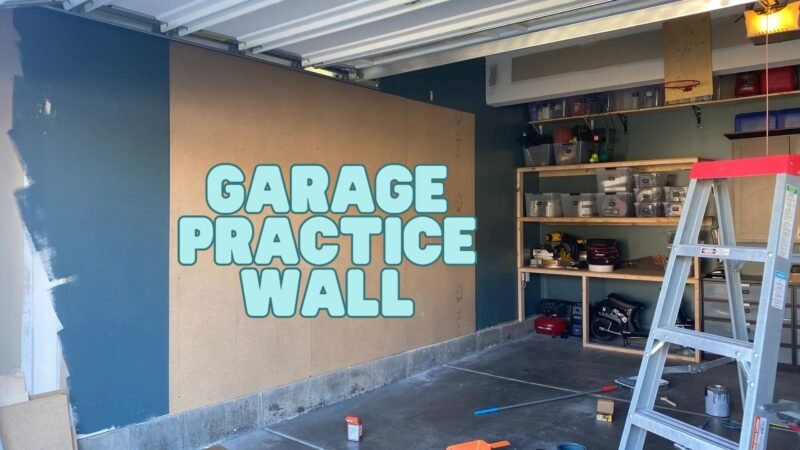
Creating a pickleball practice wall in your garage is possible and a fantastic way to ensure you can practice outside regardless of the weather. Your garage offers a protected, controlled environment to set up a practice area tailored to your needs.
Here are some considerations and tips for making the most out of your garage space:
Space and Clearance
Ensure your garage has enough room for the wall and allows you adequate space to move and swing freely. A typical garage can accommodate the necessary dimensions for a practice wall, but planning the layout to maximize your practice area is essential.
Also, Check the height of your garage ceiling. While pickleball doesn’t require as much overhead clearance as some other racquet sports, having enough space to practice serves and lobs without restriction is beneficial.
Wall Construction
As with any practice wall, durable materials like plywood are ideal. Given the controlled environment of a garage, you might not need weather-resistant materials, but consider using them if your garage is subject to temperature fluctuations or moisture.
In Installation, Securely mount the plywood to a wall in your garage, ensuring it’s well-supported and stable. If your garage walls are unsuitable for direct mounting (e.g., if they’re made of drywall), you may need to build a frame to attach the plywood to or use free-standing supports.
Protecting Your Space
Consider the impact of balls and equipment on your garage floor. Interlocking floor mats or a large area rug can protect the surface and provide better footing while playing.
Also, consider good lighting because it is crucial for effective practice. Most garages have limited natural light, so adding bright overhead lights can create a better playing environment.
Multi-Use Considerations
If your garage also serves as a storage area or workshop, consider how to maintain functionality. Wall-mounted racks, ceiling storage, and collapsible or movable practice walls can help preserve space for other uses.
Ventilation
Proper ventilation is essential, especially during intense practice sessions. If your garage doesn’t have good natural ventilation, consider adding fans or a portable air conditioner to keep the area comfortable.
Pros and Cons of a DIY Pickleball Practice Wall
One of the most significant advantages of a DIY practice board is the ability to customize it to your exact preferences and needs. You can choose the dimensions and materials and add personal touches like adjustable sections or specific target areas.
However, this customization comes with the cost of time and effort. A DIY project can take several days to complete, especially if you’re working on it in your spare time.
There’s a unique sense of satisfaction and pride that comes from building something with your own hands.
For many, this emotional reward outweighs the convenience of purchasing a pre-made option. Additionally, the skills you learn and the experience you gain from a DIY project can be invaluable for this venture and future projects.
Making the Decision
When deciding between a DIY pickleball practice board (Wall) and a pre-made rebounder, consider your budget, the time you can dedicate to the project, and how much you value customization.
If you enjoy DIY projects and have specific requirements for your practice wall, building it yourself can be a rewarding experience. On the other hand, a pre-made rebounder might be the way to go if you’re looking for convenience and immediate use.
Conclusion
As we learned how to make a pickleball practice wall, It presents an exciting opportunity to enhance your game right from the comfort of your home. Whether you choose the rewarding path of a DIY project or opt for the convenience of a pre-made rebounder, the benefits are substantial.
From improved shot accuracy to better physical conditioning, the investment in your practice environment is an investment in your pickleball prowess. Embrace the process, and let your Pickleball practice be a cornerstone of your journey to becoming a more skilled and confident player.
FAQs
How To Use A Pickleball Rebounder Wall?
Using a rebounder wall is straightforward. Start with basic volleys to get accustomed to the rebound speed and angle. Progress to practicing serves, forehand and backhand shots, and targeting specific wall areas to improve accuracy and control. Regular practice can significantly enhance your reflexes and game strategy.
How To Build A Pickleball Backboard?
Building a pickleball backboard involves:
- Selecting durable materials like plywood.
- Constructing a sturdy frame.
- Securing the backboard.
Finish by sanding, painting, and adding desired markings for target practice. Ensure it’s mounted securely, indoors or outdoors, to withstand the impact of repeated play.
Can You Play Pickleball at Home?
Absolutely! You can refine your skills at home with a practice wall or backboard. While you won’t be able to simulate a full doubles game, you can practice shots, work on your serve, and improve your hand-eye coordination, all within your own space.
Can I Practice Pickleball Against a Wall?
Yes, practicing against a wall is an excellent way to improve your game. It allows for repetitive practice of different strokes and serves, helping build muscle memory, improve shot accuracy, and increase reaction time. Just ensure the wall is of adequate height and width for effective practice.
What Are the Benefits of a Pickleball Practice Wall?
A practice wall offers numerous benefits, including convenience, the ability to practice regardless of weather or availability of a court, and the opportunity to focus on specific areas of improvement. It’s a valuable tool for beginners to learn the basics and for advanced players to refine their skills.
Is It Worth Investing in a Pickleball Practice Wall?
A practice wall is a worthwhile investment for anyone serious about improving their pickleball skills. It provides unlimited opportunities to practice and hone your skills without needing a partner or court access. Over time, the benefits of skill development and physical conditioning can significantly enhance your gameplay.


